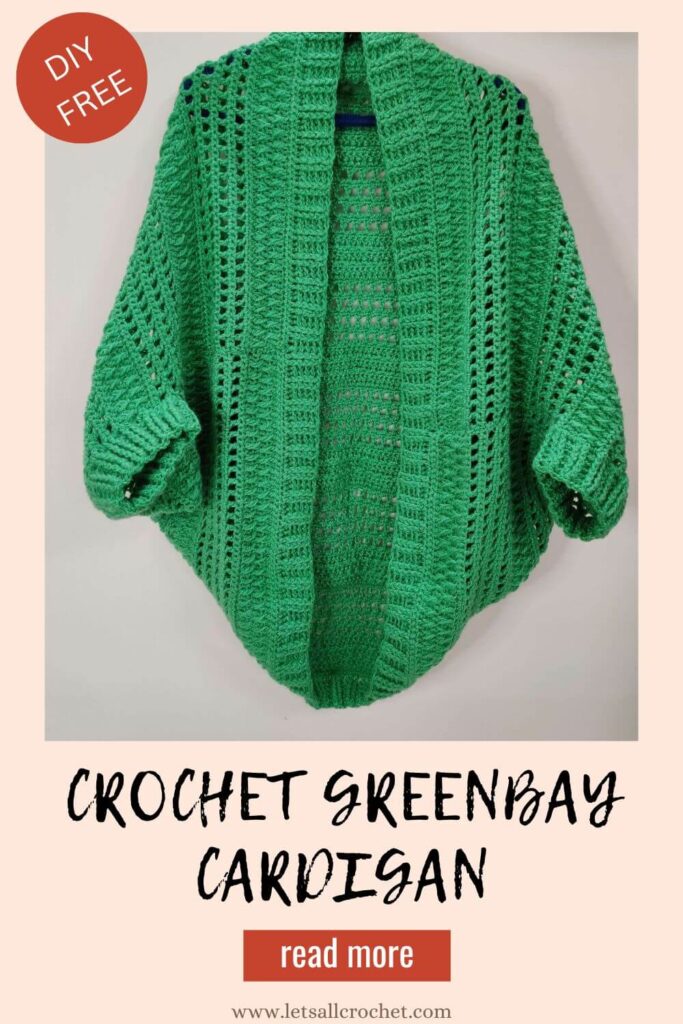
Greenbay Cocoon Shrug Pattern and Tutorial
Last updated on September 4th, 2025
Its time to snuggle up with this soft cocoon style shrug! It is stylish enough to wear outside and cozy enough to wear at home! The textured pattern looks beautiful! It makes a lovely present. It works up fast and is easy to make using single crochet, double crochet and front post double crochet. The size can be easily adjusted.

This post contains affiliate links, which means if you make a purchase from the links below, I will get a small percentage of the sales at no additional cost to you. Thank you for your continued support!
Inspiration:
I wanted to create something with the alpine stitch. The stitch looks like teardrops or drops of water to me. Green color is one of my favorite colors. This was the perfect green for this shrug. Add the stitch and the color together and this cardigan shrug immediately looked like a Greenbay Cocoon Shrug to me! I decided to add a little bit of a lacy look also to the shrug making it suitable for warmer and cooler climate.
I hope you enjoy making and wearing this as much as me!

Construction
The construction of this cardigan is very easy and beginner friendly. This cardigan is made in one piece. It is a made from bottom up. We will crochet our rows to and fro till we reach the height we want. We will crochet a large rectangle and then fold it and sew the sides to create armholes. Add a border for the center of the cardigan and the armholes.
Yarn details
Any dk weight or weight 3 yarn can be used to crochet this bolero jacket. Feel free to adjust the size of the hook to match gauge if you want. Or you can follow the measurement in inches. I have used an acrylic yarn, but any material of yarn can be used. Use a cotton mix yarn for warmer weather, and a wool mix for colder weather.
Stitch details:
We will use the alpine stitch to make this cocoon cardigan. It consists of front post stitches. This is a popular stitch and looks awesome no matter what garment or accessory we crochet. It is one of my favorites. They are completely explained in the YouTube tutorial.
The border of the cardigan has front and back post stitches (all explained in the youtube tutorial).
You can purchase the AD FREE pattern. It is available in the form of a downloadable, low cost PDF (less than a coffee) in my shops. Click your favorite place to shop patterns. Print and crochet at your convenience. Give yourself this gift! You deserve this!!
Skill level: Beginner, easy beginner tutorial available (see last page).
Sizes
S/M (L/XL, 2XL/3XL, 4XL/5XL)
To fit bust: 32- 38 (40- 46, 48- 54, 56- 62)”
Finished measurement of rectangle
Width: 38 (43, 48, 53)”
Height: 32 (32, 35, 35)”
Size can be easily altered. The instructions are given for S/M size. Larger sizes are given in (). The fit has positive ease.
Similar patterns you may enjoy: Teddy Bear Lounging Shrug
Material
Yarn: Any DK weight or weight 3 yarn can be used.
Similar yarn: Paintbox Yarns Simply DK; Shade: Grass Green 129.
Material: 100% acrylic.
Amount needed: 485 (548, 662, 731) g or 1463 (1656, 1998, 2206) yards.
Yardage: 302 yards/ 276 m in 100 g/ 3.5 oz.
Hook: 5 or H size crochet hook.
Note: For a change in border/ size more yarn than stated may be needed. You can use any yarn you want suitable for your hook size just follow the measurement in inches. Pattern look will become larger or smaller depending on yarn and hook size.
Notions: Tapestry needle, scissors, measuring tape, stitch markers/ safety pin.
Gauge
In 4 by 4” in pattern A/ B: 18 st in pattern, row (1 to 12) .
Gauge is not important, just ch the width in ” of rectangle required for size, repeat rows till height is reached.
Abbreviations
- ”= inches
- bpdc= back post double crochet
- ch= chain
- ch- 1 sp= ch 1 space
- dc= double crochet
- dc2tog= double crochet two together/ decrease stitch
- fig= figure
- fpdc= front post double crochet
- hk= hook
- rep= repeat
- rnd= round
- RS= right side, WS= wrong side
- sc= single crochet
- sk= skip stitch
- slst= slip stitch
- st= stitch
Notes
- The pattern is written in US terminology.
- The width of the large rectangle is where the sleeves fall on the outstretched arms (below elbow), and the height of the rectangle is from the neck till where you want the shrug to end (below rear). Adjust the width and height of shrug as required.
- Chain the width. Repeat rows till you reach length. The cocoon shrug is worked back and forth in rows to form a large rectangle, rectangle is then folded and the sides are sewed to make armholes.
- Last we work the edging for the centre of shrug and armhole.
- Work the mesh stitches loosely as the mesh tends to shrink. You can step up a hook (5.5 mm) for mesh rows if you want. I have used a 5 mm hook for entire pattern.
- Ch any even number for width of shrug.
- Stitch count remains same in all rows = (foundation ch) – 1
- Ch 2 counts as dc in main pattern. Ch 2 does not count as dc in border.
- The length may be slightly different for pattern B because of the row repeats being different in pattern A and B.
- The shrug is designed to be loose and oversized. Sizes are mentioned in the format: S/M (L/XL, 2XL/3XL, 4XL/5XL). Adjust size as needed.
Special stitches
Front post double crochet/ fpdc
For shrug:
Step 1: Yarn over,
Step 2: Working in front of previous row, insert hook from front to back to front around the double crochet post,
Step 3: Yarn over,
Step 4: Pull up a long loop,
Step 5, 6: (Yarn over and pull through 2 loops) twice. Sk sc behind the fpdc.
Fpdc For border
Yarn over, working in front of previous row, insert hook from front to back to front around the double crochet post, yarn over and pull up a loop, (yarn over pull through 2 loops) twice. (do not pull up long loop)
Back post double crochet/ bpdc
Step 1: Yarn over,
Step 2: Working in front of previous row, insert hook from back to front to back around the double crochet post,
Step 3: Yarn over,
Step 4: Pull up a loop,
Step 5, 6: (Yarn over and pull through 2 loops) twice.
Double crochet two together/ dc2tog
[Yarn over, insert hook in next stitch, yarn over and pull up a loop, yarn over and pull through 2 loops] twice, yarn over and pull through all 3 loops.
You can purchase the AD FREE pattern. It is available in the form of a downloadable, low cost PDF (less than a coffee) in my shops. Click your favorite place to shop patterns. Print and crochet at your convenience. Give yourself this gift! You deserve this!!
Pattern A and B
The shrug can be made either with pattern A or B. The mesh repeats are different in both. Choose either pattern A or B from images below and follow the same for entire shrug. I have used pattern B in the shrug displayed.
Pattern A figure below
")
Pattern B figure below
")
Pattern A
Foundation ch: Ch 172 (194, 216, 238).
Alteration note: Ch any even number, ch the width of shrug.
Row 1 (WS): Sc in 2nd ch from hk, sc across. St count= 171 (193, 215, 237)
Row 2 (RS): Ch 2 (counts as dc for all rows in rectangle), turn, sk 1st sc, dc across.
Row 3: Ch 1, turn, sc in 1st dc, sc across. (Note: End with sc in 2nd ch of ch 2)
Row 4: Ch 2, turn, sk 1st sc, *fpdc in dc below next sc, dc in next sc; rep from * across. (Note: End with dc in last sc. See special stitches for fpdc)
Row 5: Rep row 3.
Row 6: Ch 2, turn, sk 1st sc, dc in next sc, *fpdc in dc below next sc, dc in next sc; rep from * till 2nd last sc, dc in last sc.
Row 7: Rep row 3.
Row 8: Ch 3 (counts as dc and ch 1), turn, sk 1st two sc, dc in next sc, *ch 1, sk next sc, dc in next sc; rep from * across. (Note: End with dc in last sc)
Row 9: Ch 1, turn, sc in 1st dc, *sc in next ch- 1 sp, sc in next dc; rep from * till last dc, sc in the space made by ch 3 of previous row, dc in 2nd ch of ch 3 (fig below).
Row 10: Rep row 8.
Row 11: Rep row 9.
Rep row (2 to 11) till rectangle is 30 (30, 33, 33)” long or till last 2”of rectangle.
Rep row (2 to 7) for last 2” of rectangle.
Leave 20- 25”of yarn and fasten off, use it to sew sides.
Skip ahead to finishing now.
Pattern B
Pattern remains same as pattern A from foundation ch to row 11.
Row 12: Rep row 8.
Row 13: Rep row 9.
Row 14: Rep row 8.
Row 15: Rep row 9.
Rep row (2 to 15) till rectangle is approximately 30 (30, 33, 33)” long or till last 2”of rectangle.
Rep row (2 to 7) for last 2” of rectangle.
Leave 20- 25”of yarn and fasten off, use it to sew sides.
Finishing: Please refer to YouTube tutorial to see the demonstration in video for instructions below.
Step 1: Fold
Place the rectangle with the RS facing up. Fold the rectangle in half. Bring the last row towards the bottom chain. After folding the WS will face up. Place the sides exactly against one another so that the stitches on both sides match.
Step 2: Add stitch marker
From the top of each side, leave a gap for the armholes and place stitch markers. Make sure the gap is same on both sides.
Armhole sizes: 6.5 (7, 7.5, 8)”.
Step 3: Sew
With the tail end left behind, sew one side closed from bottom up till stitch marker leaving the armhole gap open. Cut a piece of yarn, about 25” (64 cm). Use it to sew the other side in the same way. Use any stitch to sew sides closed (I have used the whip stitch). Weave in any remaining ends.
Tip: Before weaving in ends and adding a border, wear the shrug and check fit of shrug and armholes, adjust if needed. While weaving in ends go through only one side of shrug.
After sewing open up the shrug and turn it inside out so that RS faces up.
Rep row 3, 4 till we reach 36” or the required height.
Note: In the shrug in picture I have stopped at 34”, model is 2XL, 5’2”.
Leave 25” of yarn and fasten off (we will use this to sew side).
Border: Work on RS
Shrug centre border: on RS
Join yarn on the bottom of shrug in any ch as shown (fig F above).
Rnd 1: Ch 2 (does not count as dc), dc in same st, dc in each chain till seam, dc2tog, dc in each sc till next seam, dc2tog, dc in each ch till end of round, slst to 1st dc.
Important:
- At the end of round there should be a multiple of 4 stitches. Decrease as needed.
- Do not pull up long loop in the fpdc and bpdc in borders.
- Ch 2 does not count as dc.
Rnd 2: Ch 2, fpdc in 1st dc, fpdc in next dc, bpdc in each of the next 2 dc, * fpdc in each of the next 2 dc, bpdc in each of the next 2 dc; rep from * till end of round, slst to 1st dc.
Rnd 3: Ch 2, fpdc in 1st fpdc, fpdc in next fpdc, bpdc in each of next 2 bpdc, * fpdc in each of next 2 fpdc, bpdc in each of next 2 bpdc; rep from * till end of round, slst to 1st dc.
Rnd 4, 5: Repeat round 3.
Alteration note: Add more rounds for border if you want.
Fasten off and weave in ends.
Armhole border: on RS
With the RS facing up, join yarn at armhole seam (fig F above).
Rnd 1: Ch 2 (does not count as dc), dc in same st, dc around as evenly as possible, slst to 1st dc.
Important: At the end of round there should be a multiple of 4 stitches.
Rnd 2, 3: Same as for centre of shrug.
Round 4, 5, 6: Repeat round 3.
Alteration note: Add more rounds for border if you want.
Fasten off and weave in ends.
Repeat exactly for other armhole.
Important for other armhole: Start with same number of dc in rnd 1 as the 1st armhole. Make the same number of rnds as the 1st armhole.
Fasten off and weave in ends.
Congratulations! Your Greenbay Cocoon Shrug is now ready!
Timestamps have been marked below video, skip ahead to rows as needed.
Channel name on YouTube: Let’s All Crochet
Copyright & Permissions
All content in this pattern, including instructions, photos, and design, is protected by copyright © Let’s All Crochet.
This pattern is for personal use only. It may not be copied, altered, translated, resold, taught in classes, or redistributed in any form (digital or physical).
You are welcome to sell finished items made from this pattern on a small scale, but please use your own photos when promoting your work. Credit to Let’s All Crochet as the pattern designer is appreciated.
If you’d like to share this pattern, you may share one photo and a direct link to the pattern on letsallcrochet.com. Please do not share or repost the instructions themselves.
This free crochet pattern is provided by Let’s All Crochet for personal use and complies with EU GPSR safety requirements. Read more here
I hope you enjoy todays pattern and tutorial on how to make an easy crochet cowl for beginners. When you make this cowl I would love to see it and share it on my instagram! Please tag me on instagram @letsallcrochetwithakita!
Want to be a crochet designer?
Check out the how to write a crochet pattern ebook here- https://letsallcrochet.com/write-freebie/
Check out my YouTube Channel for Designers Here: Crochet Designing With Akita
Thank you for reading my pattern right here on the blog, When you stay and read the pattern on here, I am compensated for my time and energy. This is a great free way to support me so I can keep designing more.
If you would like to save this for later, press CTRL + D to bookmark the page or click the heart/star on your mobile browser.
CLICK TO PIN ME FOR LATER!

Hi, I’m Aki! I love designing patterns and love teaching. I use lots of stitches and colors and try to simplify everything because all patterns become easy once simplified. I mostly create womens garments in all sizes. I hope you enjoy!