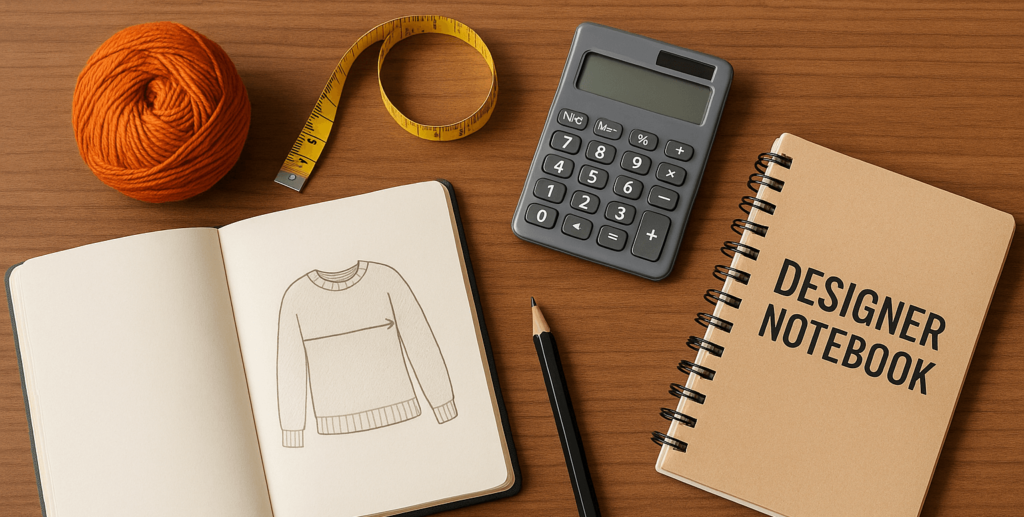
How to Write A Crochet Garment Pattern in Sizes XS to 5XL: Ultimate guide for Aspiring Designers
Introduction
When I first started designing, creating a garment felt like a huge milestone — one of those “someday” goals that sat on my to-do list for far too long. I loved the idea of seeing my own garment design come to life, but it felt intimidating.
It wasn’t that I didn’t have ideas. It was that every time I thought about turning one of those ideas into an actual pattern, I’d freeze. I didn’t know where to begin, what to focus on first, or how to make sure the end result would actually fit someone other than me.
Fast-forward to today — I’m Aki, and I’ve now designed almost 100 crochet patterns (probably more by the time you’re reading this!). Through experience, trial and error, and a whole lot of frogging, I’ve learned that garment design doesn’t have to be overwhelming.
The truth is, it’s not about guessing or winging it. It’s about following a clear, step-by-step system that takes you from idea to finished pattern — without chaos, confusion, or endless rewrites. When you have that system in place, your garment is practically ready by the last step.
And that’s exactly what I’m going to walk you through today.
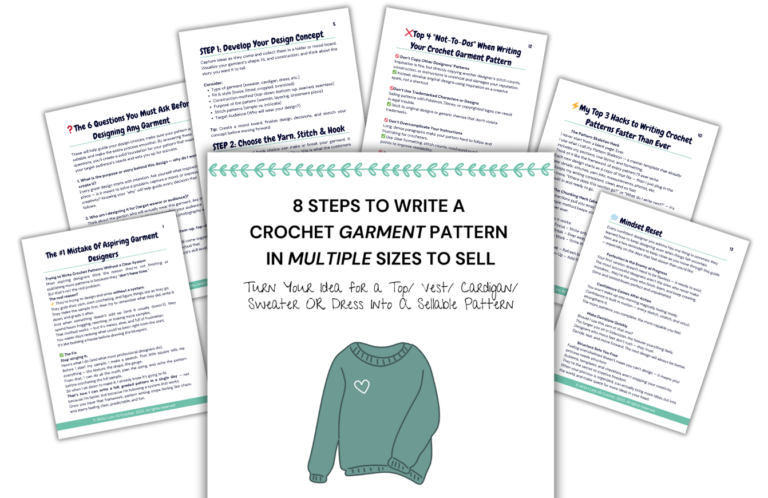
My goal with this post is simple: to show you the exact 10 steps you can follow to create your own sellable crochet garment pattern in multiple sizes. This is the process I’ve refined over years of designing, testing, and releasing patterns for makers all over the world. With it, I’m able to create a fully written garment pattern — in 9 sizes — sometimes in a single day.
By the end of this post, you’ll understand the core stages of garment design and see how using a structured process makes pattern writing not just easier, but actually fun.
This article is for you:
- If you are an aspiring garment designer who wants to sell written patterns
- If you want to earn an income designing crochet patterns
- If you sell readymade crochet garments but now wanna earn from written patterns as well.
- If you have never written a pattern in your life, but feel a calling towards designing crochet garment patterns for others, then this video is for you.
The Vision
Before we get into the steps, I want you to imagine something:
Picture someone wearing a garment they crocheted from your pattern. Picture the joy on their face when they say, “I made this!” because of your design. Picture waking up one morning, opening your email, and seeing another notification that says: “You’ve made a sale.”
That’s what makes all of this worth it.
 Before We Begin: Free Resources to Help You Succeed
To help you follow along and put everything into action, I’ve created the:
 Free Pattern Design Guide
This downloadable guide includes the exact 8-step framework I personally use to design my garments from idea to final written pattern. You can grab it HERE.
 Matching 12-Page Garment Design Workbook- How to get it free
This workbook will guide you through each step with templates, worksheets, and planning pages to help you go from idea → size-inclusive pattern → ready-to-launch product.
I’ll show you how to get it for free toward the end of this guide — it’s available FREE for a limited time!
What Exactly Counts as a “Garment” and “Multisize” or size inclusive?
When I say “garment,” I’m talking about crochet clothing that’s made to fit and be worn on the body — not just accessories like hats or scarves. Think sweaters, cardigans, tops, dresses, vests, skirts, even pants or shorts. Garments require more planning and precision than accessories.
When I say “multi-size,” I mean offering your garment in at least nine sizes (XS to 5XL). This kind of inclusivity not only builds trust but also shows your brand as modern, thoughtful, and professional. It’s one of the simplest ways to stand out and increase your pattern sales.
Let’s Talk About Approach
Here’s something important: when it comes to designing crochet garments, every designer has their own method. Some people prefer to pick up their hook and just “wing it,” jotting notes as they go. That’s not how I do it.
Designing without a system usually leads to mistakes, wasted time, and unnecessary frogging. You end up crocheting extra samples until one happens to fit — which is frustrating, expensive, and inefficient.
As designers — especially if we run our businesses solo — our time is valuable. The more efficiently we create and release patterns, the faster our portfolio grows, the more ideas we bring to life, and the more income we can generate.
A clear process doesn’t just make designing faster — it makes it more enjoyable. You get to spend your energy on creativity, not correction.
How to Use This Guide
This guide is designed to walk you through the garment design process step-by-step. Each section builds on the previous one, so I recommend reading it in order from start to finish—especially if this is your first time designing a garment pattern.
My challenge to you is simple: don’t try to tackle everything at once. Focus on just one step at a time. When you follow the process in the correct order, the overwhelm disappears and the path forward becomes clear. Before you know it, you’ll have your garment fully designed, sized, and ready to write.
Get the Free 8-Step Design Guide
To make this even easier, I’ve created a free guide that includes all 8 steps in a printable format. You can keep it beside you as you work through your pattern. Grab it HERE
This is a Comprehensive Guide: This will be a long article, because I want to cover everything you need to know to design garments. To make it easier, I’ve created a free guide you can grab now! I have written down all the steps we will discuss today. I have even provided a space for taking notes if you want to.
This is the Complete Blueprint to writing your own garment pattern
This article is the full blueprint for designing and grading a size-inclusive crochet garment pattern. Let’s begin.
Step 1: Start with a Design Concept
I’m not going to go deep into idea generation today — that’s a whole topic on its own — but I do want to share a few important thoughts on it.
First step in designing is coming up with a design idea and capturing it on paper with sketches and words. This will be your roadmap. The visuals and the description help you match your final garment to your original vision, and keep you on track throughout design process.
So how do we come up with our concept?
1. Start with Ideas
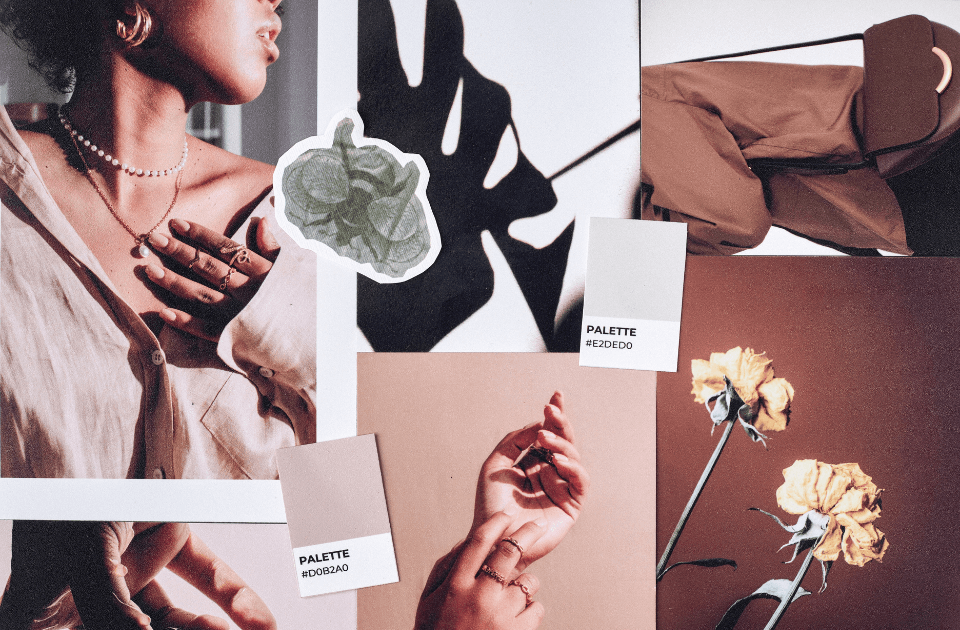
Ideas and inspiration don’t come to me when I try to force it. they come randomly. The key is to capture ideas the moment they strike. I always save them in a digital folder or digital mood board immediately. They are easily forgotten.

👉 Watch the full step-by-step video on YouTube, where I walk you through all 8 stages of designing a size-inclusive crochet garment pattern—from idea to final written pattern.
I have trained myself to get my inspiration from outside of crochet patterns from the start. If we look at patterns some ideas tend to get stuck in our heads, and we end up copying parts of them, even if we didn’t plan it. This does not give the feeling of “its mine” and copying is not ethical.
If you have many ideas, how do you decide which idea to go with?
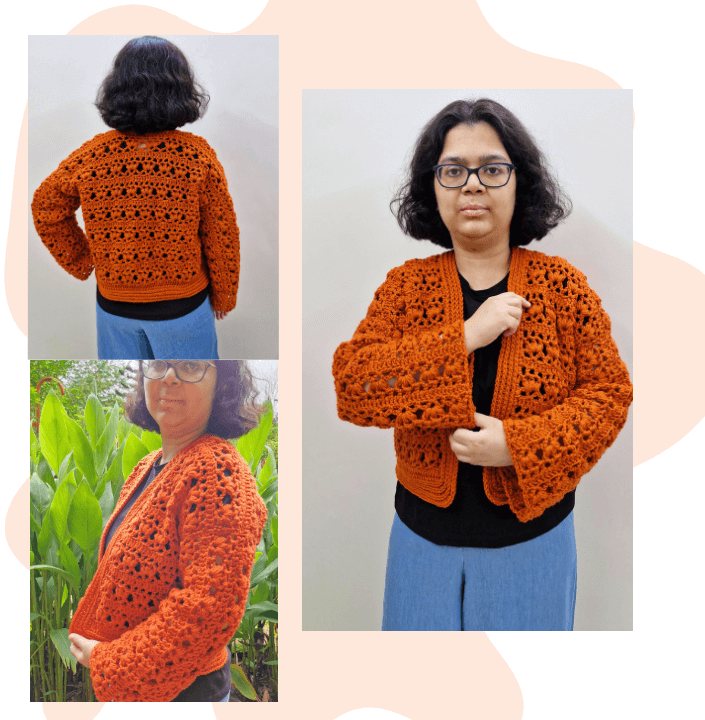
Go with your gut. Often, when a design keeps nudging me, till I create it. Like this cardigan that was on my mind for maybe over a year.
2. Visualize Your Garment
Now we want refine the details of our design.
- Type of Garment: Decide whether you want to create a sweater, cardigan, or something else.
- Overall Style: Determine the fit and other design details like pockets, hoodie and so on.
- Construction Method: Choose how you’ll construct your garment—top-down, bottom-up, seamed or seamless, assembled in panels or not.
- Target audience: Who do can you see wearing your pattern?
3. What Is the Story Behind Your Garment?
Every garment we design always carries a story. When our audience understands it, they become invested in the pattern and in our brand.
Refine and Summarize Your Concept
Do some research to make sure your idea is unique at this point if you want. Make sure it’s practical to create and appeals to your target audience. Write a short summary of your garment’s inspiration and style—this will keep you focused and can be used to write your shop listing descriptions and in marketing later.
Most important tip: Start Simple with Your First Pattern
If this is your first garment pattern, my best advice is to start simple. Even if you usually crochet advanced patterns, writing a pattern in multiple sizes is completely different. You don’t want to overwhelm yourself by adding complex shaping and intricate stitches to your first design. The goal is to finish and launch your first pattern in 9 sizes, so you can move on to the next with the experience and confidence in your pocket.
Action Step:
Build a mood board filled with inspiration if that helps you visualize your design.
Take some time to develop your design concept and sketch your idea. Your sketch doesn’t need to be perfect—it just needs to make sense to you. keep in mind, your design might evolve over time.
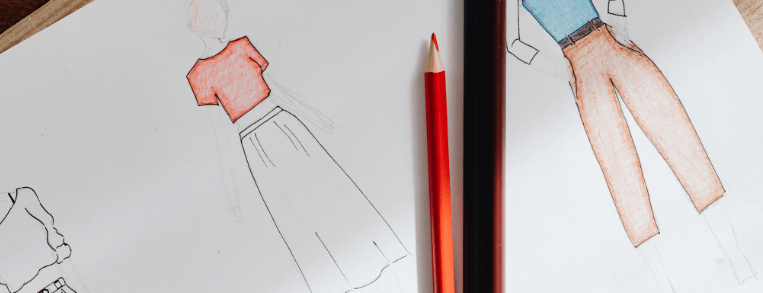
Just for laughs, let me share a sketch of my design with you.
Step 2: Choose the Right Yarn & Stitch Pattern
This is honestly one of my favorite parts — mostly because it’s when I get to justify buying more yarn (because I get to convince myself I don’t have the exact yarn I need for the idea in my head!).
The yarn and stitch pattern can totally make or break a design. When someone scrolls past your pattern, the first thing they notice is how it looks — and that all comes down to your yarn and stitch choices. I could talk about this forever, but at the end of the day, the best way to know if something really works is to swatch it.
Here are some things you should pay attention to while picking yarn:
Yarn Fibers:
When selecting yarn fibers for your garment, consider the season, drape, and function of your design.
Yarn Weights:
Yarn weight plays a role in your garment’s thickness, weight, the way the stitches will look and drape.
Right Yarn Color:
Color is always the first thing that catches my eye. Even if the fit is perfect, if I don’t love the color, I probably won’t want to wear/ buy it. The color you choose should reflect your brand’s style and set the right mood for your design. it can make the difference between lots of sales and no sales.
Accessibility:
Many crocheters want to recreate your garment exactly as shown in your pattern. If you use a rare shade or expensive yarn, it might limit the appeal of your design.
Choosing Stitch Patterns:
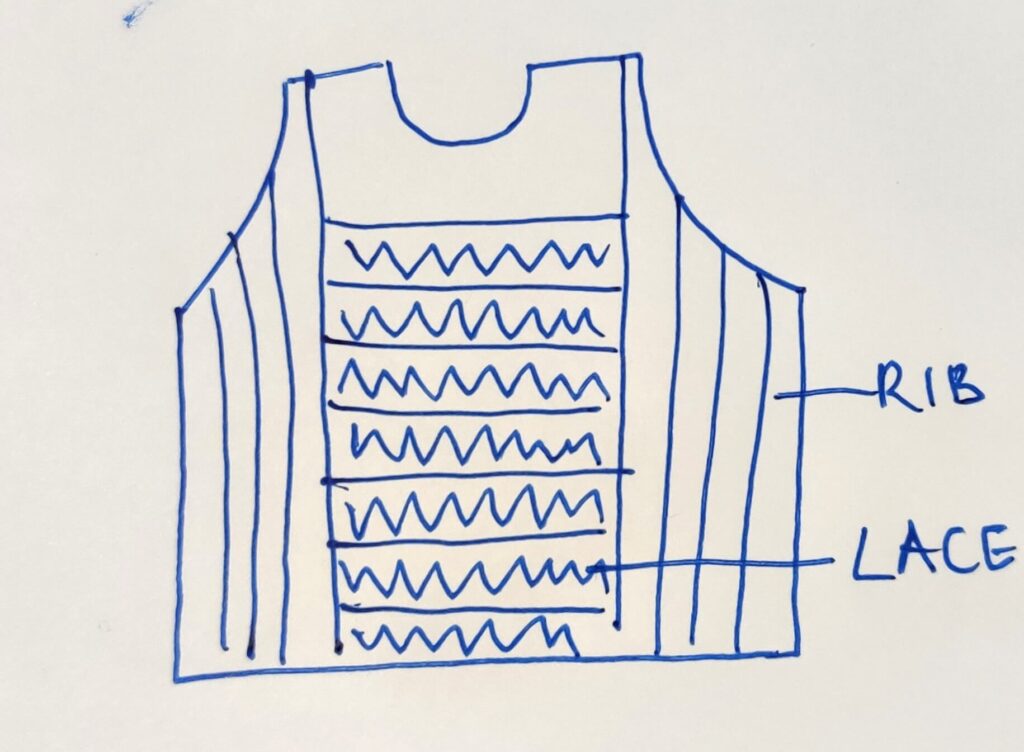
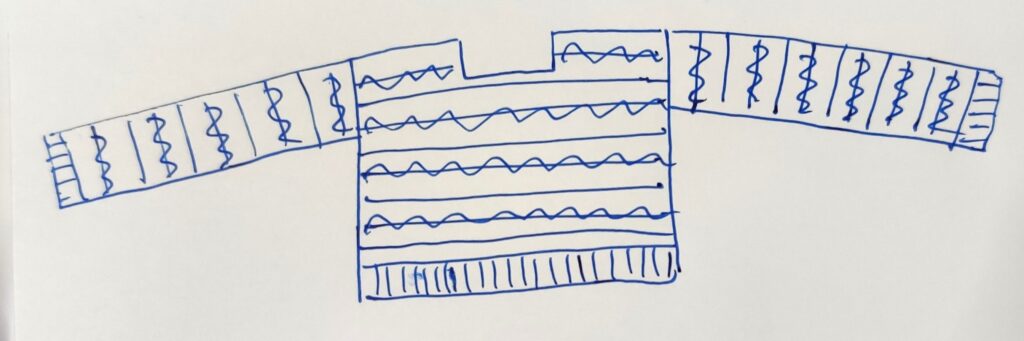
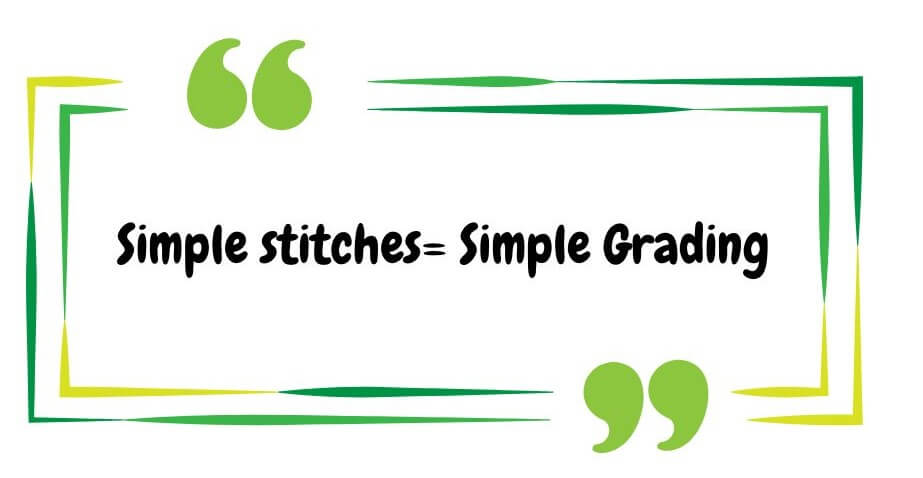
Simplicity is often the best approach here—especially if you’re creating your first pattern in multiple sizes. Basic stitches make pattern writing and grading much easier.

As you design more, you will experiment more, and soon the world becomes your oyster.
Choosing Your Hook Size:
Start with the hook size on your yarn label unless you already have a preference. Your hook size affects drape, more drape as the size in mm increases. And the stitches also look different.
Action Step:
Pick your potential yarn, hook, stitch choices.
Step 3: Create a Gauge Swatch
I love this part of designing — it’s where I create the fabric I want to see in the finished piece.
This is our design’s sneak peek — it shows how our stitches will look, how the fabric will drape, and how your garment will behave once it’s worn. Skipping it is like skipping the taste test at an ice cream shop — we miss out on the best flavour or in this case the best version of our design!
Swatching is also the foundation of garment design. It’s how we size our patterns. As designers, our goal is to make it as easy as possible for makers to replicate our designs accurately — and a clear, well-documented gauge is what makes that possible.
Its time to think like a scientist —this is when we experiment, test ideas, and tweak our fabric before committing to a full Sample. After all, would you rather redo a small swatch or frog an entire sweater five times?
Sometimes it takes me an entire day to get the fabric right; other times, I nail it on the first try.
The more you play with different yarns and stitches, the more you learn about them and the faster you’ll start creating the fabric that matches your vision perfectly.

The whole swatching process involves 5 steps:
- Make a Swatch or 100:
- Your swatch should be atleast 6-inch by 6-inch (15 cm x 15 cm) for a garment. Larger swatches provide more accurate measurements and a better understanding of the fabric’s drape and behavior. Smaller swatches can lead to inaccurate gauge measurements.
- Evaluate the Fabric:
- Closely examine the drape, stretch, and texture of the swatch.
- Finalise your swatch
- Pick your favorite fabric.
- Measure Your Gauge:
- Carefully measure your gauge in the center of the swatch. Always measure your unblocked and blocked gauge also for garments.
- Document Your Gauge:
- Write down your gauge measurements clearly with exact stitches and rows. Do not round off.
If you are interested, I will show you how I swatch for my garment pattern soon in another video on my youtube channel HERE.
Action Step:
- Shift Your Mindset – From today, see swatching as an exciting part of the process—your first real glimpse of your design coming to life and it is also a time saver.
- Experiment Freely – Play with different yarns, stitches, and hooks to discover your perfect fabric. Don’t be afraid to spend a little extra time on swatching. You will learn so much from it.
- Record Your Gauge – Measure accurately and document your stitch and row counts in your garment design workbook or wherever you want.
Step 4: Take Accurate Body Measurements and Decide Size
So is it time to crochet yet? No my friend, it’s still not time to start crocheting just yet! Why? Because before we dive into crocheting our sample, we need to plan out the pattern properly. This is where the magic (and math!) happens.
We’ll do a little number-crunching and find what works for our side, then make sure everything lines up and confirm that our design can work beautifully across all 9 sizes. Trust me — spending a bit of time here will save you hours of frogging later.
These are the simple 4 steps I follow:
- First, I decide the size of my sample garment.
- Then, I figure out how many sizes I want to include.
- Next, I take body measurements for all those sizes and
- add ease to each one.
That gives me the finished garment measurements — so I can calculate the stitches and rows for my sample size and for all the other sizes to make sure the pattern works, before I ever start crocheting.
Before we go into detail with all these steps, lets discuss:
My Thoughts on Made-to-Measure vs already graded patterns:
As designers, our job is to do the math for our makers and make our patterns as easy as possible to follow. Makers shouldn’t have to calculate stitch counts or adjust measurements themselves—they should be able to pick up your pattern and crochet with confidence. That’s what sets you apart as a professional.
You can absolutely include customization or made-to-measure tips within a graded pattern, but having your pattern pre-graded makes everything simpler for both you and your customers. Made-to-measure designs often require extra customer support, and as your sales grow, constantly answering sizing questions or doing math for each buyer can quickly lead to burnout.
Most magazines and professional publications also prefer or require graded patterns, since they reach a broader audience and maintain consistent standards.
That said—it’s your pattern and your creative choice, my friend. You’re the designer, and you get to decide what works best for your business and your energy.
Now lets get back to step 4.
1. How to Choose Which Size to Make for your sample:
You can start by designing a sample in your own size. This makes it easier to test fit and comfort. If you are using a model for finished pictures, you can crochet the sample in the size of the model so it fits them.
Two Ways to Approach sample size Measurements:
- Measure Yourself (or Your Model)
If you’re creating a custom-fit garment, taking your own measurements—or those of the person modeling your sample—is the best approach. It ensures a perfect, personalized fit right from the start. - Use a Standard Sizing Chart
For multi-size patterns, designers rely on standard sizing charts for consistency. The Craft Yarn Council’s sizing standards are especially great for new designers—they provide trusted, ready-to-use measurements that make grading easier and help your patterns fit a wide range of crocheters.
2. Decide Your Pattern Sizes
Choose all the sizes you want your garment to be available in — ideally from XS to 5XL (or even more!).
Pattern grading, or sizing, is simply the process of taking your original sample size and mathematically scaling it up or down to create the rest. You don’t need to actually crochet the garment in every size to write a fully graded pattern — and you definitely shouldn’t rely on testers to figure out your sizing for you. Testers help make sure your pattern is clear and fun to follow — asking them to figure out pattern math is a bit unfair as the offer their services for free.
Once you understand how to size one garment correctly, you can size nine or more with the same math-based approach. So why not offer a full, inclusive range? Patterns that include more sizes reach more makers, establish you as a professional designer, and build trust in your brand.
The demand for size-inclusive crochet patterns is only growing — and the designers who cater to every body are the ones who’ll stay relevant and keep selling long-term.
The process of grading over time becomes faster and faster as you get better its second nature. With spreadsheets and AI, you can automate most of the math and make grading easy.
3. Measurements you need for your pattern
The specific measurements you need depend on your garment type. At a minimum, you’ll typically need:
- Bust or chest circumference: This is often the primary measurement for sizing garments. It’s the measurement garment sizes are based on. Measured around the widest part of your bust.
- Length: How long you want your garment to be whether cropped or hip length or anything else, on the body.
Depending on your design, you may also need extra measurements like:
- Armhole depth: Important for a comfortable fit.
- Sleeve length and width: Changes form garment to garment.
- Waist circumference: Particularly important for fitted garments or designs with shaping.
- Hip circumference: Essential for longer tops, tunics, or dresses.
- Shoulder width: Helps the garment fit well across the back and shoulders in set in sleeves.
- Neckline dimensions: Take measurements depending on the neckline you want to make.
- Yoke measurements: For raglans and circular yoke sweaters.
4. Add Ease to Your Measurements:
Once we have the body measurements we add ease to get the garment measurements.
Body measurements +/- ease= Garment Measurements.
- Positive Ease: The garment is larger than body measurements for a loose fit, such as in oversized sweaters or relaxed tops.
- Negative Ease: The garment is slightly smaller than body measurements for a snug, form-fitting look—common in tank tops and fitted designs.
- Zero Ease: The garment matches the body measurements exactly, creating a fitted but not tight look.
Your audience may like fitted crop tops or oversized sweaters. Consider both the style of your design and the preferences of your target audience when deciding how much ease to add to your garment.
Action Step:
- Write down Sample size measurements
- Write down each measurement in your size range
- Determine the ease and final measurements
- Fill all of these details in your Garment Design Workbook. You can grab the free garment design guide HERE — and you’ll also get the option to access the full workbook version.

Step 5: Do the Math for Your Size and Grade Your Pattern
This is the part that everyone gets most stressed about. It’s time to translate your swatch into stitches and rows for you size and grade your pattern. This is what we will use to bring our design to life in 9 sizes or more.
Lets discuss 2 things before we do some grading
- Why Do the Math Before You Start Crocheting?
- The Two Ways to Grade a pattern
Why Do the Math Before You Start Crocheting?
Some people start by making a chain and measuring it against their body, while others begin by doing the math for their sample. The problem with starting from the chain is that after working a few rows in the pattern, the length almost always changes — which means you’ll have to redo it for the garment to be the right size… sometimes more than once.
I’ve done this before, and I choose not to do it now. It’s frustrating to wing it — it stops my creativity. Skipping the math leads to frogging, frustration, and wasted hours. Redoing sections or even full samples isn’t inspiring — it’s time-consuming and slows you down as a designer. Every pattern ends up taking longer to finish, which keeps you from moving on to your next idea.
That’s why I prefer to plan everything in advance. We’re also going to check if our design can be translated into all 9 sizes easily or not — because some patterns can be surprisingly challenging to grade. And honestly, wouldn’t you rather know that on day one instead of finding out a month later, after you’ve already crocheted the sample?
The Two Ways to Grade a pattern
When it comes to grading your crochet garment pattern, there are two main options:
- Do the Math Yourself:
This option saves money and gives you full control over your designs. The more you practice, the faster and more confident you’ll become at grading. With practice, grading becomes easy with spreadsheets and AI. This allows you to create size-inclusive patterns without breaking the bank or wasting days. - Hire a Tech Editor:
While hiring a tech editor can save time, it often costs hundreds of dollars per pattern—a significant expense if you’re regularly creating new designs. It is an excellent option if your budget allows it. Learning to do this yourself is a valuable skill if you plan to design a lot of garments. Plus most tech editors have a wait list so you may need to wait before they get to your garment.
How to Calculate Your Stitch and Row Counts for your sample size:
- Start with Your Gauge Swatch:
Your gauge swatch tells you how many stitches and rows fit into 4” or 10 cm. - Translate Measurements to Stitches and Rows:
Use simple math to convert your garments measurements into stitches and rows.
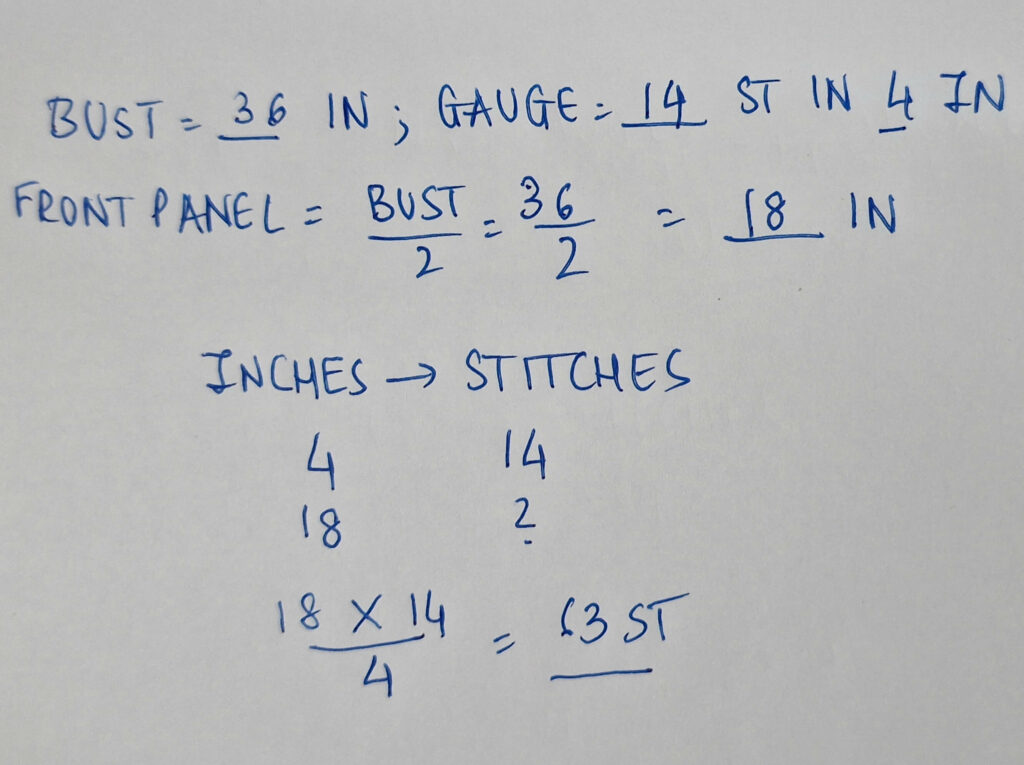
Example Calculation:
Suppose you’re designing a sweater with a bust measurement of 36 inches, and your gauge is 14 stitches per 4 inches using double crochet.
- Calculate Front Panel Width:
The front panel is typically half the bust measurement, so 36 inches ÷ 2 = 18 inches. - Convert to Stitches:
If 14 stitches = 4 inches, how many stitches do you need for 18 inches?
You need 63 stitches for the front panel with a simple solve for X.
That’s it — you’ve just used your gauge to turn a body measurement into a stitch count.
You’ll repeat this same process for other garment measurements — and for all your sizes.
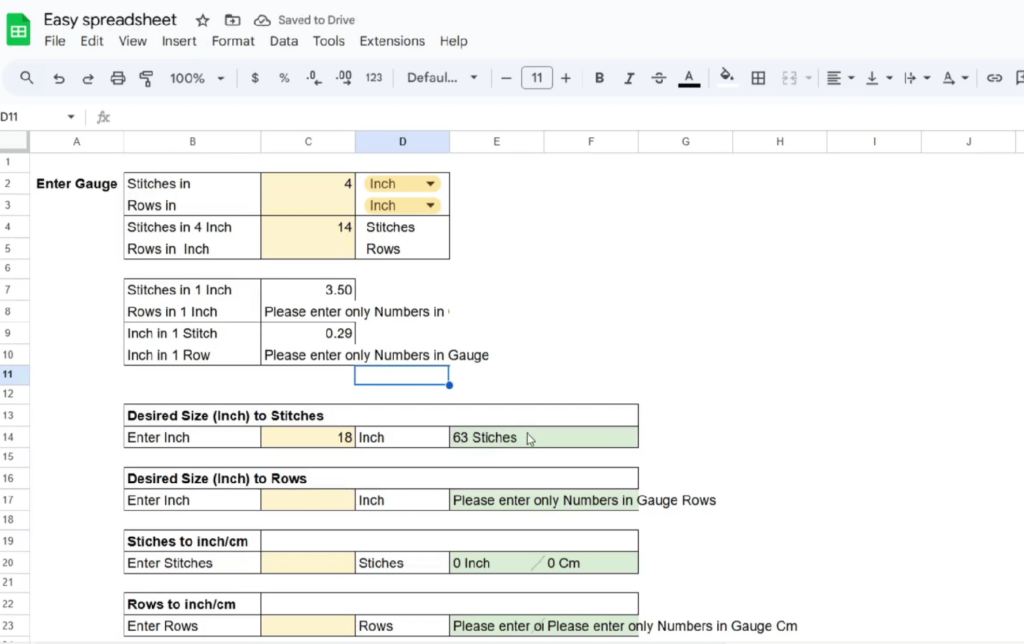
The Designer’s Secret to Grading
To make sizing faster and more accurate, many designers (including me!) use spreadsheets and AI. They speed up the math, minimize mistakes, and help you create size-inclusive patterns easily.
You don’t need any special tech skills or software to use spreadsheets.
I want to show you my simplest first spreadsheet I created years ago now.
For more complex designs — like garments with shaping or advanced stitch patterns — I rely on more advanced spreadsheets that handle all the details for me (I even have special ones for hats!).
These have saved me so much time and errors.
If you’re ready to simplify the math, speed up your design process, and confidently create well-graded patterns — and you’d like my help or use my spreadsheets — book a call using the link in the description!
Action Step:
Calculate the stitch and row counts for your sample size first.
Then, repeat the same math for all other sizes — and you’ll have a complete size range ready before you even start crocheting. Fill in your workbook if you like.
Note: Stitch multiples.
If your patterns have a stitch multiple round to the nearest multiple.
You can round up or down. This is a designers decision.
Now: Can Your Pattern Work in 9 Sizes?
This is the moment of truth.
Once you’ve completed the math for all sizes, you’ll immediately see whether your design is truly size-inclusive — or if adjustments need to be made. Some stitch patterns or construction methods simply don’t scale well across sizes, and it’s much better to identify that now than after crocheting the sample.
If the math flows smoothly across all sizes — congratulations!
Your design is ready to move forward.
If the numbers aren’t working… don’t panic.
This doesn’t mean your idea is bad — it simply means it needs an adjustment in:
- Stitch multiple
- Construction style
- Ease
- Shaping
This step is not about perfection; it’s about empowerment. You’re making a smart designer decision before investing your time in crocheting a sample for a pattern that won’t translate across sizes.
Your job at this stage is simple:
➡ Confirm that your pattern can be graded successfully across all sizes — or make the necessary adjustments now, while it’s quick and easy to do so.
Step 6: Write a rough draft of the pattern
Now that we have our math, we are going to write our pattern. A pattern is more than just instructions—it’s your brand and your reputation.
Well written, clear, easy to understand patterns is what brings us repeat buyers. If someone purchases your first pattern and they are unable to read it they may never purchase from you again. Sometimes they will even leave a dreaded negative review.
So a well written pattern creates loyal fans because they are confident they can finish your pattern, they are eager to buy your latest designs because they trust you.
Well written patterns also mean fewer questions from buyers that frees up time and it gives us bigger professional opportunities like yarn collabs and being featured in magazines.
How do I know my pattern is a success?
I know I’ve done my job when the first message from a customer is a photo of their finished project or the post the picture in a review. This means my pattern has told them everything they need to know to succeed in making the project without my help.
How to Write a clear, well written, Professional Pattern:
I am going to cover this topic in the future in great detail, so be sure to check that video out if you are interested.
Use the 3-Section Pattern Writing Formula to guide you:
- Foundation & Setup – Include skill level, sizes, finished measurements, Materials, Gauge, and Abbreviations, special stitches and notes .
• Main Instructions – Write step-by-step instructions with stitch counts for each row/round.
• Finishing & Pattern End Details – Include instructions for Blocking, Seaming, and Final Touches.
The Mindset Shift: You’re Not Just Writing a Pattern—You’re Delivering an Experience
Think about what extra mile can you go? Each pattern is an opportunity to build a relationship with your customer. Your goal is not just to sell a pattern but to create an experience so good that it leaves them excited for your next release.
Action Step:
Write a rough draft of your pattern using all the math and planning you’ve completed. As you write, think about how you can over-deliver on value.
Consider what your ideal customer might struggle with and add small touches—like tips, links to tutorials, or pictures—and make note of what else you need to create.
Step 7: A Foolproof, Money-Saving 3-Step Testing Process
We want to make the process of crocheting our pattern as easy and fun as possible for our maker. This three-step testing process helps catch as many errors as possible and in the process saves money also.
Step 1: Self-Tech Edit and Self-Test:
After writing a rough draft, I thoroughly review my written pattern. I then crochet a sample following my own written instructions, approaching it as if I were a new maker seeing the pattern for the first time. Follow the pattern exactly.
This step helps catch obvious mistakes, confusing directions, and any fit issues early on. make the required changes in your pattern.
Step 2: Tech Editing:
It’s generally recommended to get your pattern professionally tech edited—especially if you’re a new designer or working on a complex garment. I always suggest getting it tech edited before testing.
Testers are not professionals like tech editors, so they may not catch structural or math errors. When your pattern is error-free, testers can focus on what truly matters—clarity, fit, and overall maker experience.
If you’ve already done your own self-edit and test first, your tech editor’s job becomes faster and more affordable, since most charge by the hour.
You can find experienced crochet tech editors in Facebook groups, on Instagram, on Ravelry, and through designer blogs that list professional editing services.
Step 3: Pattern Testing by Others:
The last step is to share your pattern with testers who provide feedback on clarity, fit, and usability. They can now test the pattern as our first real customers would. They also help promote our pattern through their finished projects later on.
How Many Testers Do You Need?
Aim for 2–3 testers per size to get well-rounded feedback. This also covers for anyone who drops out mid-test.
Where to Find Testers:
- Instagram, Facebook groups, or Ravelry.
The Testing Process (Quick Overview):
- Post a Tester Call – Share what you need from testers, deadlines, and what testers get in return.
- Run the Test – Stay available for questions and updates.
- Collect Feedback – Focus on clarity, fit, and overall experience.
- Revise & Finalize – Apply tester insights to your pattern.
Pro Tip:
Treat testers like your first customers.
A positive experience builds long-term supporters who promote your future designs.
Action Step:
This is the most fun part — crochet your own pattern. Then get it tech edited and tested so it’s ready for the world.
You can use the workbook to keep track of the testers.
Step 8: The big day.
We’ve done everything to get our pattern ready — now it’s time to share it with the world.
I follow a simple 3-step launch process: get ready, launch, and evaluate.
Authentic, strong marketing will always make a difference in sales.
- Pre-Launch: Get Ready
The best launches always include a little prep.
Present your pattern in the best light — literally.
Take your final clear photos from all angles, create a clean, eye-catching layout, and start sharing sneak peeks on social media.
Research pricing before you decide on a final price.
Decide your launch day. Pick a calm, stress-free day to launch so you have time to interact with potential customers.
Prepare everything before launch day — your listing description, photos, price and social media posts.
- Launch: Share It With the World
It’s finally the big day!
List your pattern on Etsy, Ravelry, or your website, and make it public.
But don’t stop there — simply listing isn’t enough— no one knows it exists yet.
You need to promote it so people can find it, trust you, and engage with it.
Early excitement and shares help boost visibility, build your brand, and get those first few sales rolling.
Announce your launch across all platforms: social media, email, and your community.
You can add a launch discount, giveaway, or crochet-along to boost visibility.
Encourage testers to share photos, and reply to every comment.
- Post-Launch: Evaluate and Improve
Once your pattern is out in the world, your job isn’t over — it’s time to reflect and refine.
Track your pattern sales and feedback.
Offering good customer service builds trust — and trust keeps them coming back for more.
Decide what you will improve for your next pattern launch to make it easier and better.
Action Step:
Step out of your comfort zone — tell everyone and their mom about your brand new pattern.
🎉 You Now Have the Complete Roadmap — What’s Next?
You now understand the full 8-step process to design and size your own crochet garment pattern. You’re no longer guessing or relying on trial and error — you have a system. And this system is exactly how real designers create size-inclusive patterns that sell again and again.
📥 Step 1: Download Your Free Garment Design Guide
This free guide breaks down all 8 steps from this blog into a printable format so you can follow along at your own pace. It’s the exact framework I use to design my own garments in 9 sizes.
🎁 Want My 12-Page Garment Design Workbook for Free?
If you’re serious about designing your own garments and would love support, feedback, or just someone to ask questions — I invite you to book a free call with me.
During this call, we’ll:
Go over where you are in your design journey
Identify what’s holding you back
Map out your next steps to start or grow your garment design business
As a thank-you for attending, you’ll receive my 12-page Garment Design Workbook completely free (LIMITED TIME offer only).
It’s a companion resource that helps you plan, track, and organize your pattern from idea to final draft.
➡ Click here to book your free call. Spots are limited each month.
🌟 I want to end with this.
Your creativity has the power to transform your life, even if you don’t know it right now. It has the power to create the freedom and impact that you are ultimately looking for. So many designers are proof of the possibility. The question becomes are you ready to take your first step?
If you found this blog helpful, don’t forget to bookmark it and check back for more tips and resources.
Thank you for reading, and best of luck as you start your exciting new journey. You’ve got this! See you in the next post!
FAQS: Frequently Asked Questions
- How do I start designing a crochet garment pattern?
To start designing a crochet garment pattern, begin with a clear design concept. Create a sketch or mood board, choose a yarn and stitch pattern, and make a gauge swatch. Then, make a swatch and calculate the measurements and stitches needed for your design before crocheting a sample.
- How do I calculate the sizing/ do the math for a crochet garment pattern?
Use your gauge swatch to convert body measurements into stitch and row counts. Calculate how many stitches are needed to achieve the desired width and length of your garment. This step also involves grading your pattern for multiple sizes if needed.
- What is pattern grading in crochet design?
Pattern grading is the process of adapting your garment pattern to fit multiple sizes. It involves using standard sizing charts and your gauge to calculate stitch and row counts for each size, ensuring a well-fitting garment for a broad range of makers. We do not need to crochet each size to grade a pattern, we use math for it.
- How do I write crochet garment pattern?
Plan Your Design – Sketch your idea, choose yarn, stitches, and construction.
Size & Grade – Use standard charts and adjust stitch counts for multiple sizes.
Write Clear Instructions – Use standard abbreviations, step-by-step directions, and stitch counts.
Test & Edit – Self-test, tech edit, and get feedback from testers.
Format & Publish – Organize sections, add visuals, and list your pattern for sale.
- Should I tech edit my crochet pattern before testing?
Yes, a tech editor reviews your pattern for consistency, accuracy, and clarity. Tech editing before testing ensures that your pattern is polished and free of technical errors, allowing testers to focus on the fit and usability of your design.
- What is the best yarn for crochet garments?
The best yarn for crochet garments depends on the season, style, and intended use of the garment. Lightweight yarns like cotton or bamboo are ideal for summer garments, as they are breathable and have a nice drape. Wool and wool blends are perfect for warm, cozy winter garments. Acrylic blends offer versatility, durability, and affordability for year-round use. Always consider the yarn’s drape, stretch, and comfort when choosing for garments.
7.How do I size my crochet pattern correctly?
To size your crochet pattern accurately, start by taking proper body measurements or using a standard sizing chart, like the Craft Yarn Council’s guidelines. Use a gauge swatch to calculate how many stitches and rows you need to achieve the desired measurements. When creating multiple sizes, grade your pattern by adjusting stitch counts and shaping to fit different body measurements while maintaining the design’s proportions.
- How do I write a crochet pattern for multiple sizes?
Include size-specific instructions using brackets or different colors in the pattern (e.g., “Ch 50 (55, 60, 65) for XS (S, M, L)”). Provide a clear sizing chart and consider using spreadsheets to manage calculations efficiently.
- How do I make my crochet pattern size-inclusive?
To make your pattern size-inclusive, grade it for a full range of sizes, typically from XS to 5X or more.
Feel free to email me at aki@letsallcrochet.com, DM me on instagram if you have any questions!
CLICK TO PIN ME FOR LATER!

Hi, I’m Aki! I love designing patterns and love teaching. I use lots of stitches and colors and try to simplify everything because all patterns become easy once simplified. I mostly create womens garments in all sizes. I hope you enjoy!